Write Your Own OS(3) — Bare Bone OS
Previous: Write Your Own OS (2) — Computer Architecture Overview
Next: Write Your Own OS(4) — Boot process
Part 1.1.2 A bare bone Operating System
As a first step, we need to set up the programming environment. Following tools are used.
- C and assembly programming language.
- GCC compiler is used to compile both assembly and C programming languages.
- QEMU is used to run our Operating System.
- GDB is used for debugging.
We can use the following command to install all the dependencies.
apt-get install build-essential qemu gdb
The code for this section can be found on the Github under branch for Part 1.1, [https://github.com/megstechcorner/meg-os/tree/part-1.1-bare-bone-os].
In this section, we assume that hardware and some other software have loaded our Operating System into the memory and transferred control to our Operating System. In the next section, we will introduce how to instruct the computer to load our Operating System and transfer control to it.
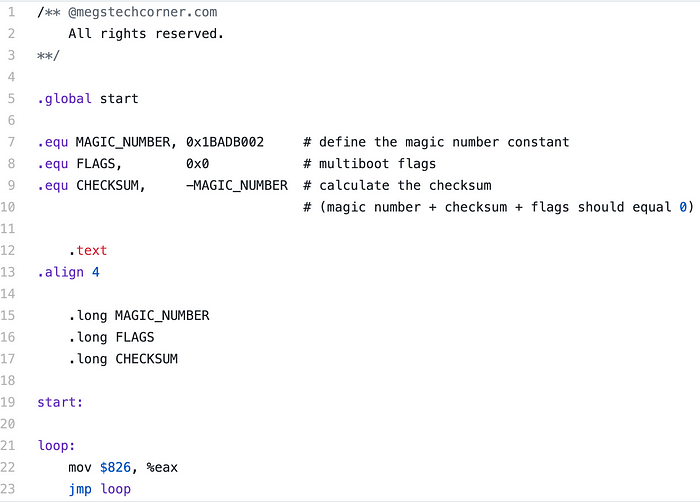
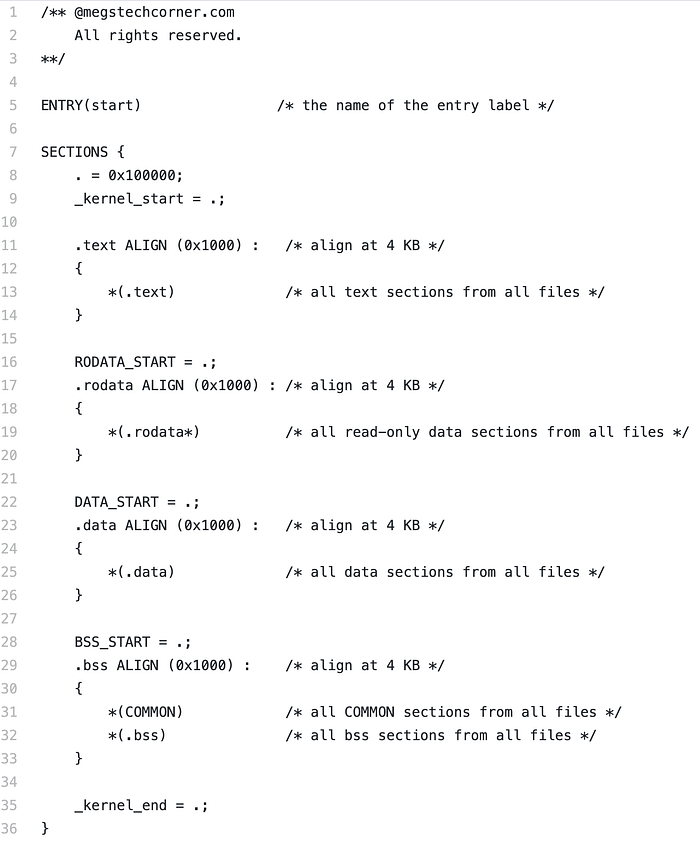
The bare bone Operating System consists of two files.
- start.S, it contains the primary logic of the Operating System.
- link.ld, it tells the loader how to load our Operating System and defines the entry point of the Operating System.

`.global start` exports the symbol start and makes it visible to the linker. We then define three constants, MAGIC_NUMBER, FLAGS and CHECKSUM, and put them at the very beginning of the code. They are used to locate our Operating System and we will discuss more in the next section. The main logic is quite straightforward. We move a constant 826 to the register eax and then enter an endless loop.

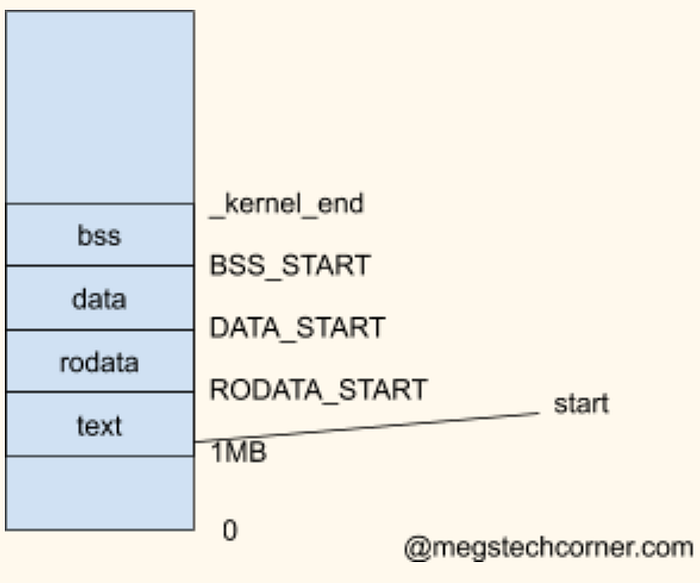
`ENTRY(start)` tells linker the entry point of our Operating System. When the loader (discussed in the next section) needs to transfer control to our Operating System, it jumps to the line of code defined by the `start` symbol in start.S. `. = 0x100000;` tells the linker that we want our Operating System to be loaded at memory 1MB. `_kernel_start = .;` saves the current address to a variable _kernel_start which is available in both assembly and C. The rest of the linker file specifies how to position different data, which should be self-explanatory. The overall effect is that our Operating System will be loaded into the memory in the following layout.

We provide a Makefile as well so that we don’t need to type the long GCC command every time. Now we have completed our bare bone Operating System!
To build and run the Operating System, we can use the following commands:
> make
> qemu-system-x86_64 -kernel kernel.elf
This will open up a new window with some logging messages, as shown in the screenshot above. This is not very interesting and we can’t verify if our Operating System did move the constant into the registers. Since we can’t print to the screen yet, we will make use of GDB to manually verify the content of registers.
Debugging with GDB
To make use of GDB, we need to launch the Operating System with two additional flags, -s and -S. The -s option will make QEMU listen for an incoming connection from gdb on TCP port 1234, and -S will make QEMU not start the guest until you tell it to from gdb.
> qemu-system-x86_64 -kernel kernel.elf -s -S
Now, we need to open another command line terminal and start GDB with the following command.
> gdb kernel.elf
Sometimes, gdb can get confused with the architecture the elf file is compiled for. Use the following command if you see an error message, “Selected architecture i386 is not compatible with reported target architecture i386:x86–64”.
(gdb) set architecture i386:x86–64
Now we can connect to the Operating System with the following command.
(gdb) target remote localhost:1234
From this point on, we can make use of the GDB commands to debug. We first set a breakpoint at line 22 of start.S. We then continue the program to run to the breakpoint, which represents code `mov $826, %eax`. After that, we execute one more step (one more line of assembly code) and now register eax should have the value 826. We can verify it by printing out the content of all registers.
(gdb) b start.S:22
(gdb) c
(gdb) step
(gdb) info registers
A screenshot of the GDB session is shown above. First column represents the register name, second column is value of registers in hexadecimal and the last column is the value in decimal. Register eax now indeed has the value 826. One thing to note is that instead of eax, GDB shows rax. They refer to the same 64-bit register where eax represents the lower 32-bit of that register. We will discuss in more detail in Part 6 when we move to the 64-bit world.
This tutorial is part of a series of tutorials that teaches how to write an Operating System from scratch.
Previous: Write Your Own OS (2) — Computer Architecture Overview
